Have a Question?
Adding & Editing Tabs in Point-N-Sell
- Intro to Tabs
- Adding & Editing Tabs
Firstly, all products and/or services are setup in Control Professional if you need instructions on how to do this go to the help menu for Inventory in Modules alternately if you have existing data that you want converted into the system contact us and we will discuss this with you. Once you have completed this task you are ready to setup the tabs and tiles for Point-N-Sell.
In Point-N-Sell you can have multiple tabs and they can be used similar to categories ie Dried goods, Frozen etc. In the first image you will see the standard two tabs that are setup at install. In the second you can see I have added one tab and renamed all the tabs.

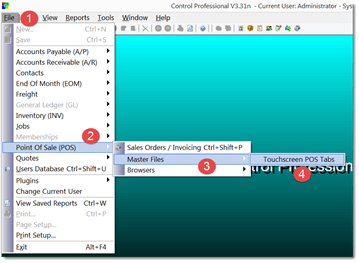
Ensure Point-N-Sell is closed and open Control Professional. Click on File – Point of Sale (POS) – Master files – Touchscreen Point-N-Sell Tabs. Using the right mouse click to bring up the add/edit menu either edit an existing tab and rename it or add a new tab. The tab number determines its position. Keep in mind that depending on your screen size you may have to use the scroll bar if you have too many to fit the area. When you reopen Point-N-Sell your new and renamed tabs will be available.


