Have a Question?
Users Overview
- Overview
- General Info
- Permissions
- Printers & Other
- Options
- Display
Setting up individual users is generally recommended as the system will remember who changes information as well as other details for audit purposes. There are also some settings that individuals can choose to their liking (like colours, etc). There should at least be one account (usually Administrator), and it should have all privileges enabled. Ideally, every user you want to grant access in the system to should be set up in Users.
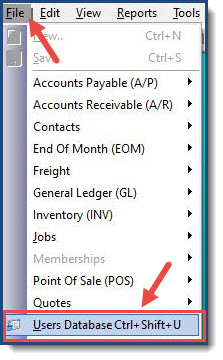
From the system menu select File, Users Database
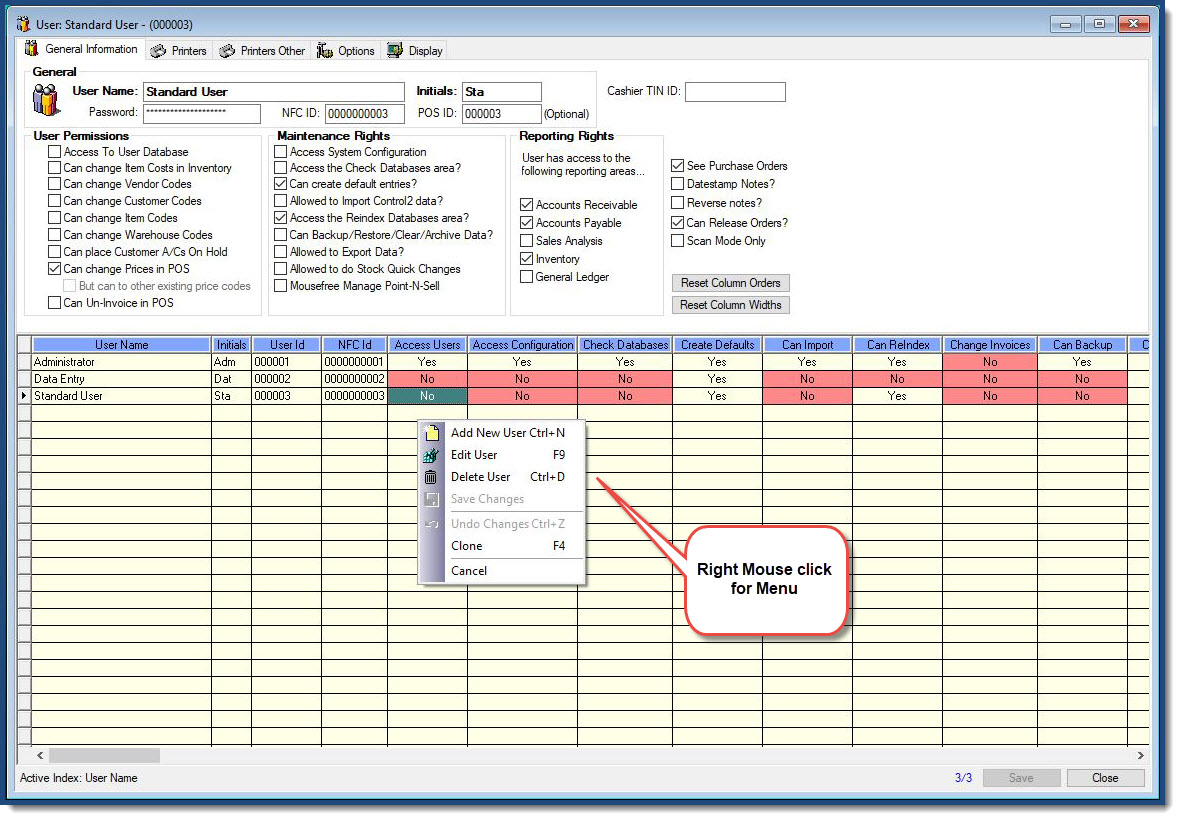
The Users window has five tab pages – General Information, Printers, Printers Other, Options & Display.
Right Click Popup Menu
When you right click on a User in Control Professional, you can do the normal add, edit, clone and delete type of functions.
Editing User Information
To edit existing information, simply click on the desired user and make your changes, click save to keep the changes.
Adding a New User
To add a new User, select the New icon and add the details or right mouse click to bring up menu. Change the data as desired and when finished, click Save. Any changes you have made will then be stored in the database.
If you are setting up multiple users or simple want to save time you can clone an existing user. Simply highlight the user you want to clone, right mouse click to bring up the menu and select clone (keyboard shortcut is F4). Enter the new user name, initials and password then click save. All other settings are completed for you.
You should advise users of their User Name and Password details so they can use their data to log into Control Professional at start-up. Any changes they make to any data will be recorded and stamped with their identification details.
A User Name, their Initials and an optional Password is required for all users.
POS ID
If you want each user to have their own login code for Point-N-Sell change this number (up to six digits). For security it should not be shared. Otherwise leave as default.
User Permissions
Still in the General Information Tab you can click to set or remove the user permissions as required.
- Access To User Database – User can change their own and other user’s options (this screen).
- Can Change Item Costs in Inventory – User can make instant changes to item costs in the inventory browser.
- Change Vendor Codes – User can make global changes to vendor code numbers.
- Change Customer Codes – User can make global changes to customer code numbers.
- Change Item Codes – User can make global changes to Item code numbers.
- Change Warehouse Codes – User can make global changes to Warehouse code numbers.
- Can Place Customer A/C’s On Hold – User can put customer account on stop credit.
- Can Change Prices in POS – User can change item prices in Point-N-Sell
- Can Un-Invoice in POS – User can “un-invoice” in Sales Orders/Invoices/Credits in Control Professional (Not Point-N-Sell) and add or remove items etc. This should be only available to Administrator level users.
Maintenance Rights
Click to set or remove the areas of the system that this user can maintain.
- Access System Configuration – Permit user to edit information in your configuration file.
- Access the Check Databases area – Give user the right to run a database checking utility on your files.
- Can Create Default Entries – User can create system wide default entries (like a sample customer, item, etc). It is recommended that this option normally be turned off once your system is live and operational with real data.
- Allowed to Import Control2 Data – User is permitted to import information from the previous DOS based version.
- Access the ReIndex Databases area – Allow this user to perform database reindexing across the system.
- Allowed to Backup/Restore/Archive? – Simply as stated, allows the user to use this function.
- Allowed to Export Data – Simply as stated, allows the user to use this function to export data to use in Excel.
- Allowed to do Stock Quick Changes – User will be able to change stock levels in Inventory.
- Mouse free Manage Point-N-Sell – for touch screen users to add items to tiles without using a mouse.
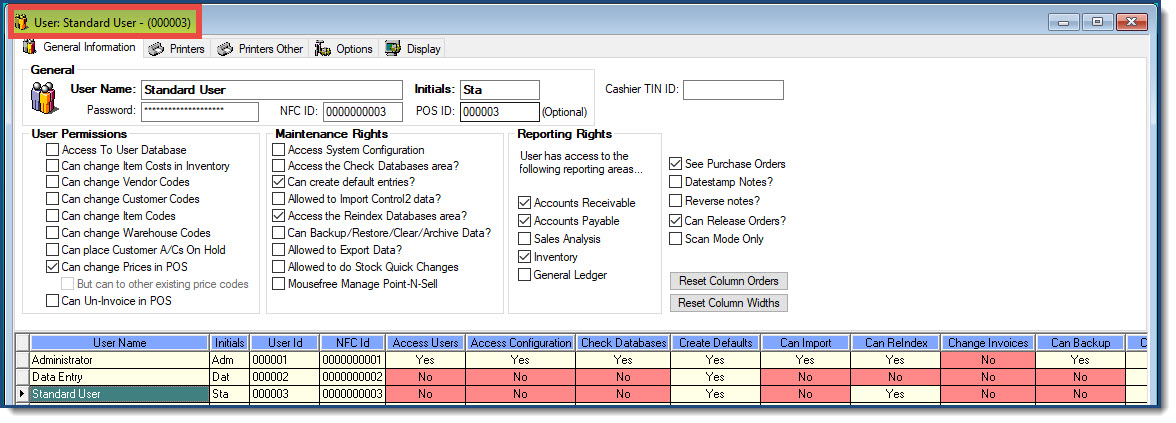
The two screenshots below show the differences on the General Tab between the Administrator User and Standard User.

These tabs are used to store the user’s preferences for certain print functions in the system. Select the appropriate printers as desired. Note: See setting up POS Receipt printer for more information.

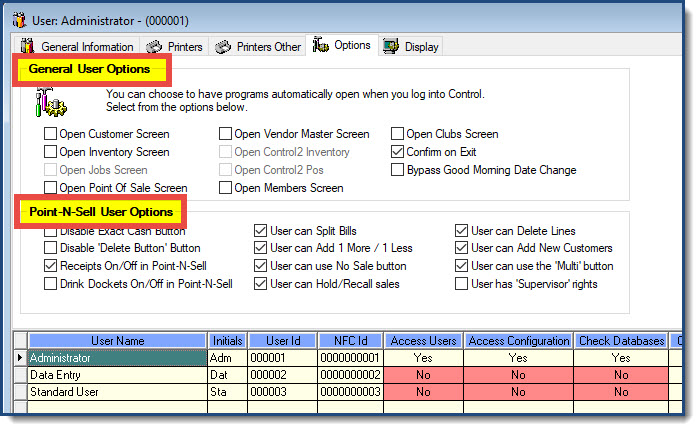
Options Tab
General User Options
Check or uncheck to have any or all of these windows open when the user logs into Control. If option is greyed out it is unavailable due to settings in Configuration.
- Open Customer Screen
- Open Inventory Screen
- Open Jobs Screen
- Open Point of Sale Screen (Sales Orders) – this is not Point-N-Sell
- Open Vendor Master Screen
- Open Control2 Inventory
- Open Control2 POS
- Open Members Screen
- Open Clubs Screen
- Confirm on Exit – System pops up a confirmation screen asking if this user really wants to close Control Professional.
- Bypass Good Morning Date Change – each day when opening Control Professional you are asked to change the system date to match the actual date. Checking this turns this off.
Point-N-Sell User Options
Check or uncheck the following for the highlighted user to change what can and cannot be used in Point-N-Sell.
- Disable Exact Cash Button
- Disable ‘Delete Button’ Button
- Receipts On/Off in Point-N-Sell – If you print receipts in Point-N-Sell leave this checked.
- Drink Dockets On/Off in Point-N-Sell – Used for cafes/bistros/restaurants.
- User can Split Bills – Used for cafes/bistros/restaurants.
- User can Add 1 More/1 Less – User can increase/decrease quantity of selected line by one.
- User can use No Sale button – Use only if you want to allow user to open cash draw without a sale.
- User can Hold/Recall sales
- User can Delete Lines
- User can Add New Customers
- User can use the ‘Multi’ button – Allows user to increase quantity of line by entering number
User has ‘Supervisor’ rights – If you have setup Supervisor security in System Configuration (Tools/Configuration/Settings/Point of Sale/Security) you can allow individual users to have this access (see screenshot below). They will need to have the password to actively use.

Display Tab
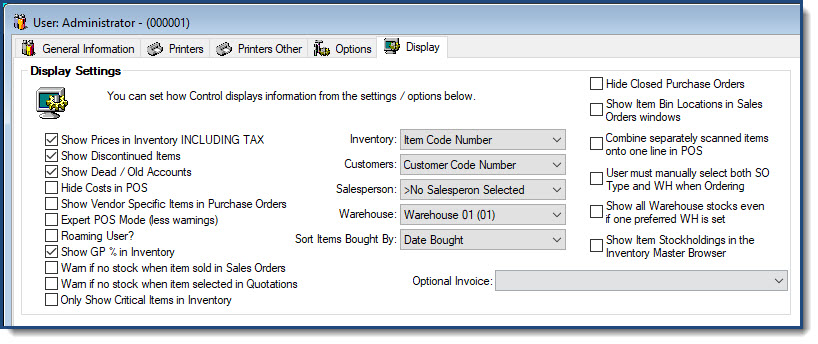
Check or uncheck to change what information the highlighted user can see in Control Professional.
- Show Prices in Inventory INCLUDING TAX – Forces the prices shown in the Inventory window to be inclusive of tax.
- Show Discontinued Items – Uncheck to hide discontinued items.
- Show Dead/Old Accounts – Uncheck to hide dead accounts (see Customer setup on flagging as dead account).
- Hide Costs in POS – used when you don’t want user to see your costs.
- Show Vendor Specific Items in Purchase Orders – Will show only items that the vendor has been appointed to (see Vendor setup).
- Expert POS Mode (less warnings) – Relates to sales orders screen in Control Professional
- Roaming User? – for users who move from warehouse to warehouse (multi locations)
- Show GP% in Inventory – Uncheck to hide this from user.
- Warn if no stock when item sold in Sales Orders
- Only Show Critical Items in Inventory – Use with caution. If you tick this all items that are not critical will not be seen in your inventory screen.
- Show Item Bin Locations in Sales Orders windows – for warehouse and distribution businesses.
- Combine separately scanned items onto one line in POS – used in warehouse situations when packers are scanning items.
Drop down boxes
Use the dropdown boxes to change the sort order for the following:
- Inventory
- Customers
- Salesperson
- Warehouse
- Sort Items Brought By
